keekkewy@qq.com
简介
功能介绍
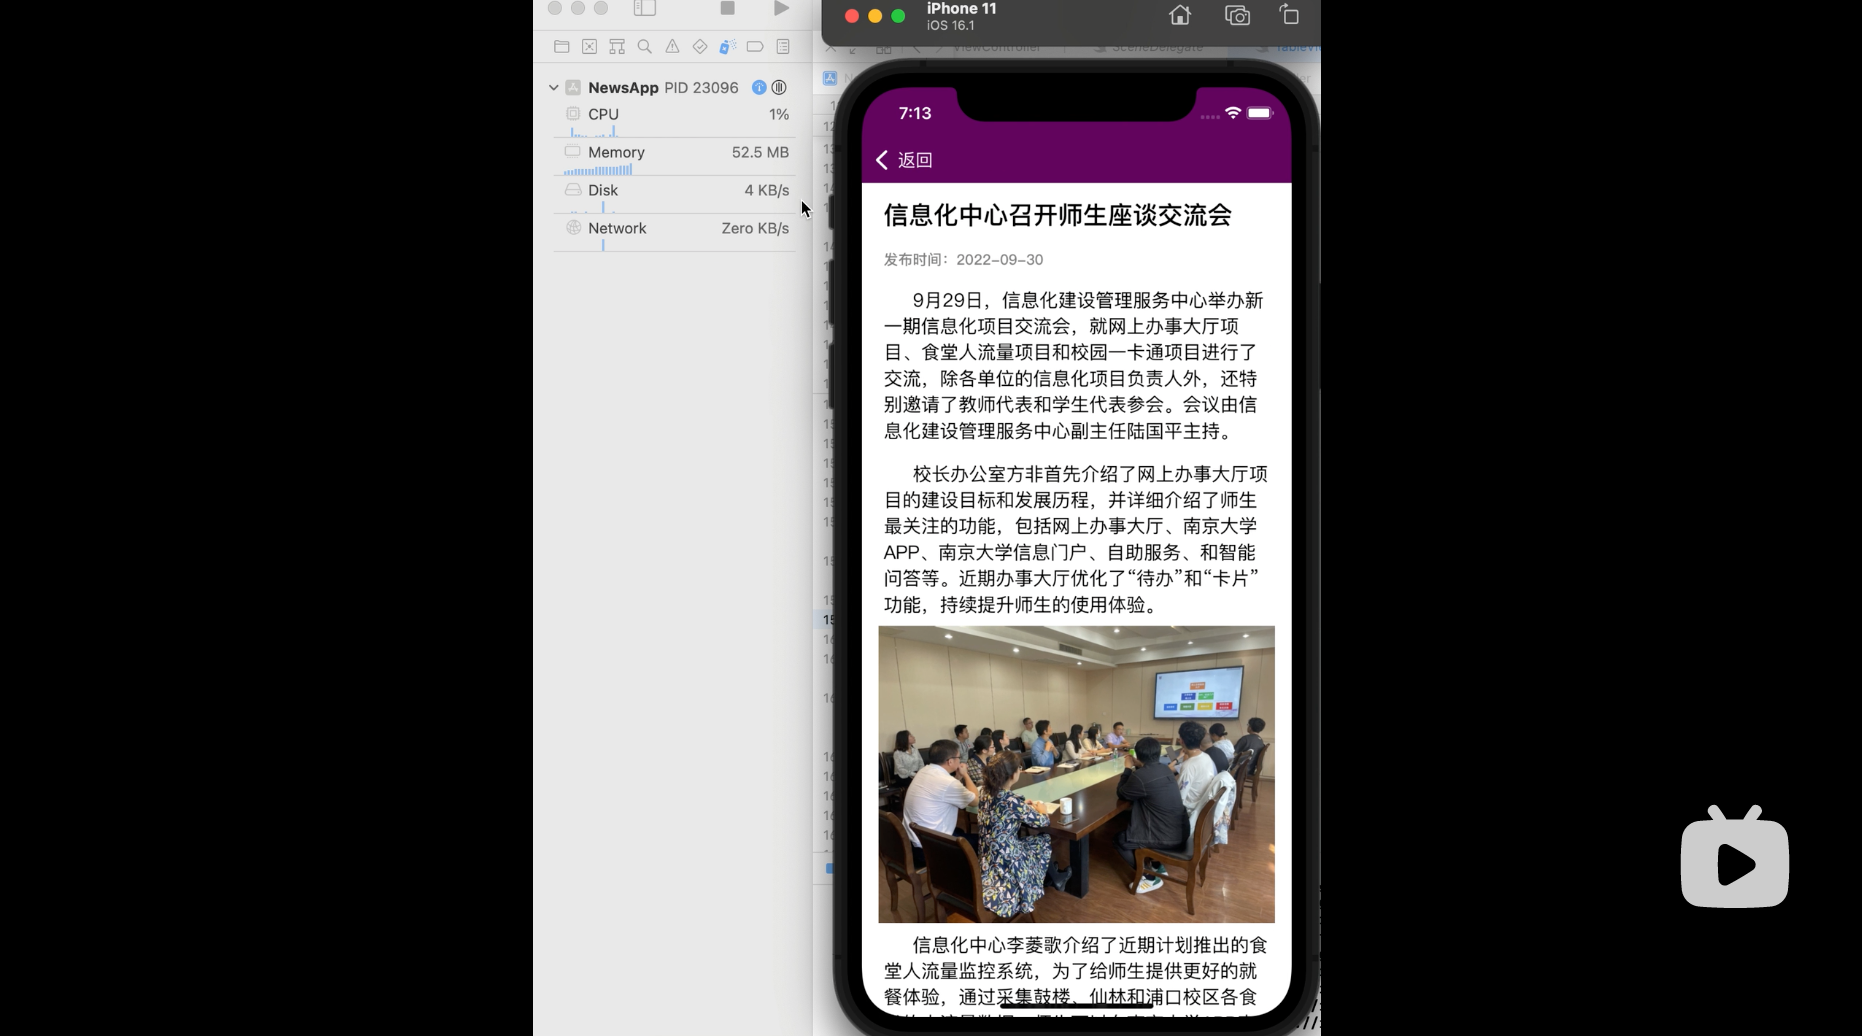
该APP是为学校信息中心(ITSC)官网设计的一个新闻客户端,包含“新闻动态”、”通知公告“、”信息化动态“、“安全公告”、“关于我们”五个板块,实时从官网上抓取新闻,支持上拉刷新,下拉加载新内容,异步加载图片和对图片、文字进行本地缓存等功能。
展示视频

技术实现
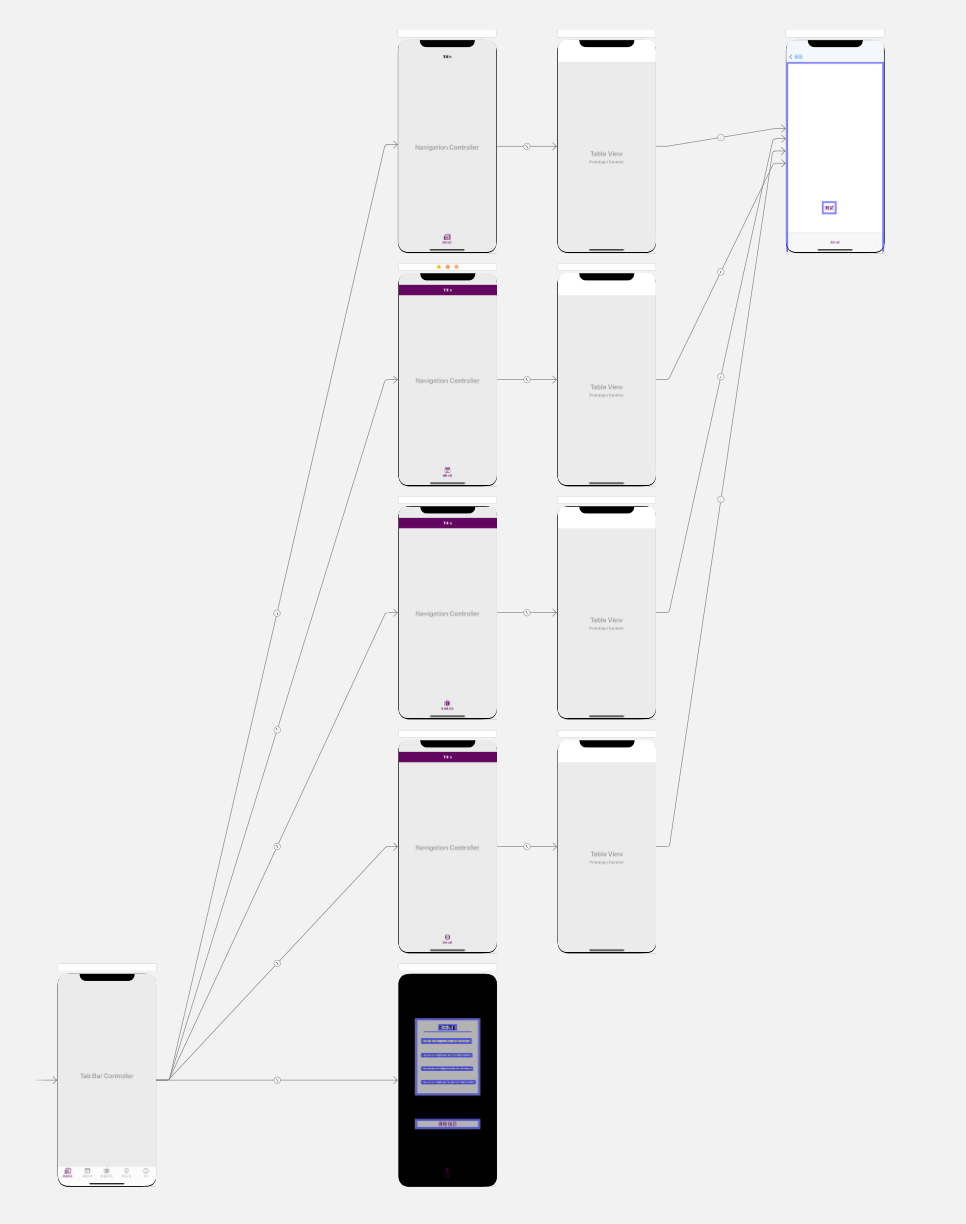
视图结构

内容目录页
每个板块使用 TableView 组织内容,没个 cell 展示一则新闻的标题和发布时间。用户点击 cell 时根据此时 cell中的内容跳转至对应新闻的详情页。
目录内容抓取
初始化 url
在目录页的 TableViewController 初始化时,根据该页面导航栏的标题设置该页面板块所对应的 url 前缀。
1
2
3
4
5
6
7
8
9
10
11
12
13
14
15
16
17
18
19
20
| required init?(coder: NSCoder) {
url = ""
receivedData = Data()
super.init(coder: coder)
switch(navigationItem.title) {
case "新闻动态":
url = "https://itsc.nju.edu.cn/xwdt/list"
break
case "通知公告":
url = "https://itsc.nju.edu.cn/tzgg/list"
break
case "信息化动态":
url = "https://itsc.nju.edu.cn/wlyxqk/list"
break
case "安全公告":
url = "https://itsc.nju.edu.cn/aqtg/list"
break
default: break
}
}
|
发送 url 请求
定义 session 用于发送和处理网络请求:
1
2
3
4
5
6
7
8
| private lazy var session: URLSession = {
let configuration = URLSessionConfiguration.default
configuration.waitsForConnectivity = true
configuration.timeoutIntervalForResource = 300
configuration.requestCachePolicy = .reloadIgnoringLocalCacheData
return URLSession(configuration: configuration, delegate: self, delegateQueue: nil)
}()
|
由于每次启动 APP 时应获取实时的新闻列表,故此处将 session 设置为不使用缓存。
将 url 前缀后直接加上 “.htm” 组成 itsc 对应板块文章列表第一页的 url 地址,在后台线程队列 requestQueue 中发起 urlRequest:
1
2
3
4
5
6
| requestQueue.async {
let curUrl = URL(string: self.url + ".htm")
let task = self.session.dataTask(with: URLRequest(url: curUrl!))
self.refreshTaskId = task.taskIdentifier
task.resume()
}
|
处理返回结果
在定义 session 时将当前 ViewController 设置为了其代理,故在当前 ViewController 中实现代理方法,并定义 receivedData 变量储存返回内容直到回复内容全部返回:
1
2
3
4
5
6
7
8
9
10
11
12
13
| var receivedData: Data
func urlSession(_ session: URLSession, dataTask: URLSessionDataTask, didReceive response: URLResponse, completionHandler: @escaping (URLSession.ResponseDisposition) -> Void) {
...
}
func urlSession(_ session: URLSession, dataTask: URLSessionDataTask, didReceive data: Data) {
self.receivedData.append(data)
}
func urlSession(_ session: URLSession, task: URLSessionTask, didCompleteWithError error: Error?) {
...
}
|
使用 scanner 根据 itsc 官网源码的格式对得到的 html 代码进行解析,从中获取每条新闻的标题、日期、正文 url以及建立三者的对应关系。
1
2
3
4
| let string = String(data: self.receivedData, encoding: .utf8)
let contentScanner = Scanner(string: string!)
_ = contentScanner.scanUpToString("<div id=\"wp_news_w6\">")
...
|
目录内容显示
自定义 TableViewCell
自定义 ArticleTableViewCell 类,并在 TableViewController 中注册:
1
| self.tableView.register(ArticleTableViewCell.self, forCellReuseIdentifier: "myCell")
|
ArticleTableViewCell 中包含两个 UILabel,一个用于显示文章标题,另一个用于显示文章日期,还有一个字符串变量保存该文章的正文 url。
其中的所有控件在初始化时通过代码设置约束,每一个 cell 在加载标题前拥有默认高度,成功设置文章标题后其高度跟随标题 UILabel。
设置 cell 内容
在 TableViewController 中实现代理方法:
1
2
3
4
5
6
7
8
| override func tableView(_ tableView: UITableView, cellForRowAt indexPath: IndexPath) -> UITableViewCell {
let cell = tableView.dequeueReusableCell(withIdentifier: "myCell", for: indexPath)
if indexPath.row < self.cellData.count {
let text = cellData[indexPath.row]
(cell as! ArticleTableViewCell).setContent(link: text[0], title: text[1], date: text[2])
}
return cell
}
|
使用此前注册的信息创建一个 cell,根据即将显示的 cell 所在的行号获取对应的数据,并对其内容进行设置。
在 TableViewController 定义变量 cellData:
1
| private var cellData: [[String]] = []
|
其为一个字符串的二维数组,每一行对应 tableView 中相同行数的 cell 的数据,每一列分别对应:正文 url、文章标题、文章日期。
下拉和上拉刷新
使用了 Github 上开源的包:MJRefresh
创建变量 header、footer:
1
2
| private let header = MJRefreshNormalHeader()
private let footer = MJRefreshAutoNormalFooter()
|
将其部署到视图中并设置事件响应方法:
1
2
| header.setRefreshingTarget(self, refreshingAction: #selector(pullRefresh))
footer.setRefreshingTarget(self, refreshingAction: #selector(pullMore))
|
在方法 pullRefresh 中将重复上文所述的请求目录第一页的操作,并将现有数据清空。
在方法 pullMore 中将请求下一页的目录信息,并将结果追加在现有数据之后,即实现用户下拉加载更多内容:
1
2
3
4
5
6
7
8
9
10
11
| requestQueue.async {
let pageNum: Int = self.pageNum + 1
let curUrl = URL(string: self.url + String(pageNum) + ".htm")
let task = self.session.dataTask(with: URLRequest(url: curUrl!))
self.pullMoreTaskId = task.taskIdentifier
task.resume()
self.pageNum = pageNum
}
|
界面跳转
1
2
3
4
5
6
7
8
9
10
11
|
override func tableView(_ tableView: UITableView, didSelectRowAt indexPath: IndexPath) {
self.performSegue(withIdentifier: "ShowDetailView", sender: self.tableView.cellForRow(at: indexPath))
}
override func prepare(for segue: UIStoryboardSegue, sender: Any?) {
if segue.identifier == "ShowDetailView"{
(segue.destination as! ArticleViewController).url = URL(string: "https://itsc.nju.edu.cn" + (sender as! ArticleTableViewCell).link)
}
}
|
文章详情页
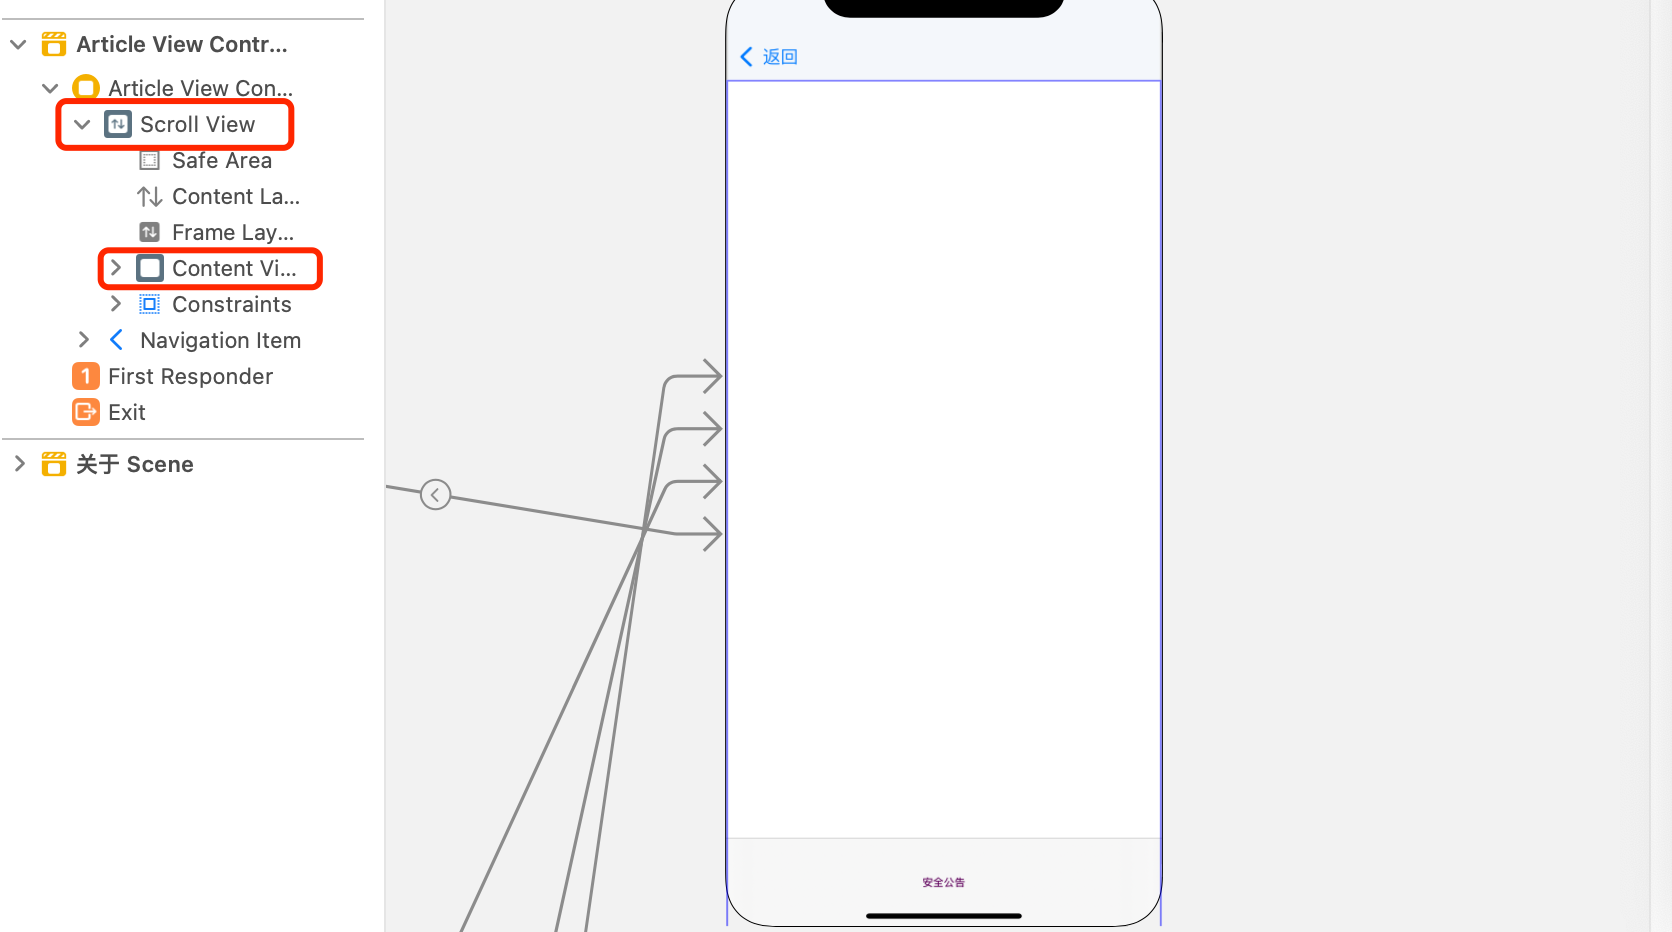
使用 scrollView 展示文章内容

在 ScrollView 中放置一个空白的 View,其高度跟随自身 y 值最大的子控件的 maxY。加载文章正文时涉及的控件作为子控件加入该 View 即可。
内容加载
使用缓存
定义 session:
1
2
3
4
5
6
7
8
| private lazy var session: URLSession = {
let configuration = URLSessionConfiguration.default
configuration.waitsForConnectivity = true
configuration.timeoutIntervalForResource = 300
configuration.requestCachePolicy = .returnCacheDataElseLoad
return URLSession(configuration: configuration, delegate: self, delegateQueue: nil)
}()
|
与之前不同的是,对于已经发布的新闻文章我们可以在第一次加载时将其保存在本地,之后都从本地加载文章内容,直到用户清除缓存。
加入子控件
同样使用 scanner 对 html 代码进行解析,根据 itsc 文章正文 html 代码的特征解析出文章标题、正文、图像 url,再根据不同的内容类型生成相应的子控件并设置约束。
所有的子控件根据其对应内容在正文代码中的顺序从上到下依次排列,每次加入子控件时都需要根据上一个加入的控件设置其 topAnchor 的约束,并将“上一个加入的子控件”更新为当前加入的控件。
contentView 的高度约束根据最后一个加入的子控件的 bottomAnchor 设置。
异步加载
其中在加入图片时,还需要对每个图片进行一次 url 请求,如果在主线程中阻塞等待其结果,则会造成界面卡顿,故我们在这里使用异步加载思路。
在进行图像的 url 请求时,先在 imageView 中添加一个活动指示器,令其播放“转圈”的加载动画:
1
2
3
4
5
6
| let indicator = UIActivityIndicatorView()
imageView.addSubview(indicator)
indicator.translatesAutoresizingMaskIntoConstraints = false
indicator.startAnimating()
indicator.centerXAnchor.constraint(equalTo: imageView.centerXAnchor).isActive = true
indicator.centerYAnchor.constraint(equalTo: imageView.centerYAnchor).isActive = true
|
再通过 DispatchQueue 的异步执行发送 url 请求,和处理响应内容。
在成功接收到图像数据后,停止加载动画,并根据图片缩放后的高度更新 imageView 的高度约束。
1
2
3
4
5
6
7
8
9
10
|
indicator.stopAnimating()
indicator.removeFromSuperview()
for constraint in imageView.constraints {
if constraint.firstAnchor == imageView.heightAnchor {
constraint.constant = image.size.height * ( self.contentView.frame.width - 32) / (image.size.width)
}
}
|
导航栏的隐藏和显示
实现 scrollView 的代理方法:
1
2
3
4
5
6
7
8
9
10
11
12
13
14
15
16
17
| func scrollViewDidScroll(_ scrollView: UIScrollView) {
let pan = scrollView.panGestureRecognizer
let velocity = pan.velocity(in: scrollView).y
if velocity < -10 {
self.navigationController?.setNavigationBarHidden(true, animated: true)
statusBarStyle = .darkContent
setNeedsStatusBarAppearanceUpdate()
} else if velocity > 10 {
self.navigationController?.setNavigationBarHidden(false, animated: true)
statusBarStyle = .lightContent
setNeedsStatusBarAppearanceUpdate()
}
}
|
由于我们的 APP 导航栏的颜色为“南大紫”,导航栏存在时系统状态栏的颜色是白色,而正文背景是白色,故在导航栏隐藏后,应将系统状态栏颜色改为黑色并刷新。
关于我们页
点击按钮清除缓存:
1
2
3
4
5
6
7
8
| @IBAction func showAlert(_ sender: Any) {
let alert = UIAlertController(title: "清除缓存", message: "清除缓存后相应的内容将会在设备联网时重新加载,这将消耗一定的流量。您确定要清除缓存吗?", preferredStyle: .alert)
alert.addAction(UIAlertAction(title: "确定", style: .default, handler: {_ in
URLCache.shared.removeAllCachedResponses()
}))
alert.addAction(UIAlertAction(title: "取消", style: .default, handler: nil))
self.present(alert, animated: true, completion: nil)
}
|
【感谢评阅】


.jpg)
